Reverse Boss Order
| Leaderboards | SRC |
|---|---|
| World Record | n/a until fixed |
| Rules | |
| Splits | [[:File:|LiveSplit file]] |
Reverse Boss Order is a category where you beat Ganon first and Armor Knights last
Contents
Conditions
Bosses are defeated if the following events happen:
- Heart Container is collected
- Pendant or Crystal is collected
- All entities are defeated ( 3x Lanmolas, 6x Armos Knights )
- Re-Fights in Ganon Tower are not necessary because you do not get a Heart Container or a Pendant / Crystal
Additional rules apply:
- Zelda has to be rescued
- The run ends with entering the Triforce Room
Boss Order is:
- Ganon
- Agahnim 2
- Trinexx
- Vitrious
- Kholdstare
- Blind
- Mothula
- Arrghus
- Helmasaur King
- Agahnim 1
- Moldorm
- Lanmola
- Armor Knights
Main Route
Escape
- Arm EG while in EG ( Stairclip or Midair S&Q, then fall in pit below east wing entrance )
- Enter B2 stairs from the rear to preserve EG
- Dodge the Green Guard and Kill Ball'n'Chain guard for the Big Key ( You can kill the Green Guard for safety, than S&Q after rescuing Zelda to re-spawn the Ball'N'Chain Guard )
- Get the Lamp and rescue you Zelda and get hit inside Zelda's cell to get back into EG
- Take the left route to dodge dark rooms to Sanctuary
- Drop off Zelda and exit north while still in EG
- Hold north until after Lumberjack, then hold up + right toward the Misery Mire Big Chest ( Jump out of EG west of the Big Chest Room )
- Get the Cane of Somaria, go West and do a Midair S&Q
Pathway

Entrance to Zelda
Zelda to S&Q

Footage
Hyrule Castle to Prison Cell
Before Thieves Town
- Re-spawn at the Sanctuary and grab the Sanctuary Heart
- Go to the Kakariko Well, grab the 3 Bomb Chest ( The one close to you after falling down ), bomb into EG and head left past Hookshot Cave
- Use a visual cue to keep link at the top of the screen
- Transition into the Mothula supertile and hold down during transition to get kicked into the Palace of Darkness Dark Maze
- Get a small magic drop from the 4 Kodongos ( 1/16 chance to not get a drop = RIP Run )
- Get the Hammer and backtrack through the Dark Maze and across the Hammeryump bridge ( You can grab the Bomb Chest top-left in the Dark Maze for safety )
- Juke the door with a Somaria Block and do a Sword-Spin while entering the transition to get to the Spectacle Rock and exit ( Door Juke )
- Go west to enter the cave to rescue the Lost Old Man and get the Mirror, then go back to Spectacle Rock
- Clip into EG with a Citrus clip and move north-east to the Thieves Town entrance
- Jump from one of the ledges into the first room of Thieves Town
- Leave Thieves Town and re-enter it to reload it
Pathway
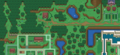
Sanctuary to Kakariko Well
EG path after Kakariko Well
Citrus Clip to TT


Visual Cue's
Statues at the bottom
Stairs at the bottom


Use the very bottom of the screen to know where you are. If you enter the screen above, the run is dead
Footage
EG before Thieves Town
Door Juke in PoD
Citrus Clip to enter TT
Thieves Town
- Rail clip into EG and jump to the Big Key
- Continue towards Thieves Town to bomb the floor above Blind, get the Maiden and get the Titan's Mitt ( Collect a Bomb and 2 small magic drops after going upstairs, located close to the switch )
- Kill the enemies with the Hammer to get a chance for Small Magic
- Get back to the Prison Room and execute a Door Juke with the Cane of Somaria
- Scroll the screen to the left by moving to the right and back again to the left
- Door Juke the door to the north and head back to the east exit ( There are pits which you can not see, pay attention while walking )
- Exit to the east and hold up + left to enter the stairs to get up to the Big Chest with the Hookshot ( Item is not visible )
- Exit east twice from the Big Chest, hold left to jump down from a ledge, than head to the north twice
- Use the Hookshot to get to the Big Chest with the Moonpearl and open it ( Item is not visible )
- Mirror back to the entrance of Thieves Town and bring the Maiden to Blind's room
- After the fight starts ( Boss music starts ), Mirror back to the entrance and leave Thieves Town
Footage
Rail Clip
Door Jukes
Item Collection
- Mirror once to get back to the real Dark World and get the 300 rupee chest located east from Thieves Town
- Head south from Thieves Town to get the Shovel, mirror to the Light World, get the Flute and go back to the Dark World
- Grab the Smithy Frog and do the quest to get the Tempered Sword and stay in the Light World
- Grab the Tavern Bottle, the Bug Net, activate the Flute, grab the Merchant Bottle and head to the Lost Forest to use the Teleporter to get to the Skull Wood
- Head north and fall down into the first pit located in Skull Wood
- Lift the pot to the right to get 1 Small Magic and leave the room to the east
- Go north, lift the pot for another Small Magic and Door Juke the exit to the north with the Cane of Somaria
- Open the chest in the middle of the room and get the Big Key for Skull Woods
- Leave the room to the east and use a Bomb Jump to open the Big Chest for the Firerod
- S&Q to Link's House and use the Flute to fly to 2
- Buy the Red Potion first, than the Green Potion
- Fly to 8 and walk north to the Ice Cave and get the Icerod ( The one where you need a bomb to open it )
- S&Q to Link's House
Footage
Door Juke Skull Wood
Ganon and Agahnim 2
- Enter Hyrule Castle, go upstairs and enter the room to the west
- Do a YBA with a Red Potion through the door you just entered. Make sure you are missing health
- After the YBA move just a bit down, equip the Hookshot, and use it facing west. Move up to fall down and enter the Ganon fight
- After beating Ganon fall down into one of the pits and use the Mirror to get back to the Hyrule Castle entrance
- Midair S&Q west of Hyrule Castle for a strong EG
- Re-spawn at the Sanctuary and leave it. Move east and fall down into the back of the Sewers from the Graveyard
- Get hit by a rat and hold down + right as long as you hit the Swamp
- Hold down until the room of the Big Chest of Thieves Town is visible and transition left
- Grab the key under the pot located in the top right corner of the room and leave the room to the south
- Freeze the Popo with the Icerod and smash it with the Hammer to get a Big Magic drop
- Use the Cane of Somaria to get yourself over the door trigger, located to the north, and do a spin while transition to the north
- Open the door to the south with a bomb. If you want you can grab the pot second to the left and right to get a heart and a bomb
- Mirror to the real Dark World and re-enter Turtle Rock
- Go to the double Pokey Room and use a Somaria Block to transition to the north
- Leave the room south and continue walking a bit south, go back north
- Open the door with a bomb and leave the room again south. After you enter south, release the D-Pad and wait until you dropped down
- Move down and up to scroll the room to fight Agahnim 2 properly
Footage
YBA for Ganon
EG to Agahnim2
Turtle Rock to Agahnim2
Big Magic with Icerod and Hammer
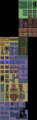
Plaid World Nr. 1
- Mirror back to the Light World from the top of the Pyramid and enter Hyrule Castle to the east
- Walk over the bridge and leave the room to the north
- Do a YBA with a Green Potion while transition to the south. Make sure you are missing magic
- Fly to 1 and hold left to drop into the water. After this go a bit to the right and move just a little bit up and down and you will collect 5 rupees infinite
- After you got at least 280 rupees, move down right to start the "autoscroller"
- When the "autoscroller" stops, move straight to the right to enter the Plaid World. Do not move up or down or you will not be able to continue the run
- Collect 1 to 2 Fairies as a safety
- Kill Trinexx and grab the Ether Medallion as well as the Heart Container
- Leave the Trinexx fight at the top left corner
- Kill Vitrious and just grab the hear container and leave the screen to the left
- Mirror back to Hyrule Castle and do a Midair S&Q to arm strong EG
Pay attention to the movement in Plaid World. Do exactly what needed. Otherwise the run dies at this point!
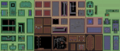
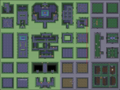
The map looks different in Plaid World so take the Pathway as a guide
Pathway
Trinexx and Vitrious

Footage
YBA to enter Plaid and getting ~280 Rupees
Boots and Crystals
- Start at Link's House and fly to 5 and leave the screen north
- Use a Citrus clip after entering the screen to enter Eastern Palace a bit faster
- Continue walking north until you enter the Canon Ball room and place a bomb in front of the statue on the left to aim EG again
- Move through EG until you enter the Misery Mire Room with the large bridge. Fall down to get on the right floor and go back to grab the Green Pendant. Pay attention while falling down to not hit the ground before. Fall straight into the pit
- Mirror back to the Light World and Flute again to 5 and get the Boots from Sahasralah. Do not jump down a ledge facing north or you will lose EG
- S&Q to Sanctuary and do a River Clip to Agahanim's Tower entrance
- Bonk against the left torch to gain EG and re-arm EG by jumping into a void
- Use the Throne Door to change the Dungeon-ID to Swamp
- Bonk back into EG and re-arm EG by jumping into a void
- Grab the Crystal from Vitrious Boss Room
- Use the Ether Medallion to open Misery Mire and bonk back into EG, jump into the void to re-arm EG and collect the Misery Mire Crystal
- Hold down after the Crystal Cutscene to clip into the right position to walk north into the Turtle Rock
- Bonk back into EG and collect the Crystal from Turtle Rock
- S&Q to Link's House
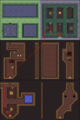
Pathway
Getting the Green Pendant

Agahnim's Tower to Swamp Crystal
Mire Crystal
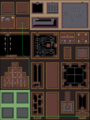
Turtle Rock Crystal


KBM ( Kholdstare, Blind and Mothula )
- Fly to 8 and execute Fake Flippers to get to the Ice Palace
- Enter the Ice Palace and do a Bomb Clip in the first room to skip a big part of the Ice Palace
- Continue like in NMG and defeat Kholdstare
- After defeating Kholdstare, fly to 3 and go north to enter the Dark World and defeat Blind in Thieves Town
- Re-enter Thieves Town, equip the Mirror, dash to the top of the first room and do an Item Dash with Y + A right on the ledge ( Mirror Jumps )
- If done correct you hear the sound of the jump and you mirror back to the entrance of Thieves Town
- You than get dragged out of Thieves Town and get pushed south by a bit
- Use the stairs for entering Thieves Town to get Spinspeed and leave the screen north east
- Enter the Skull Wood dungeon at the first possible skull entrance
- Walk into the Red Bari and get to Mothula while in EG
- While fighting Mothula make sure you center the camera. Otherwise the Crystal can drop in positions where you can not collect him
Footage
Mirror Jump EG
Ice Palace Bomb Clip
Pathway
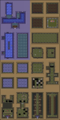
Entrance to Mothula

Arrghus
- After beating Mothula mirror back to the Light World and Fly to 2
- Buy a Red Potion and a Blue Potion
- Fly to 6 and Bomb Clip on the Overworld into the Desert Palace entrance located north west
- Walk east and than north until you enter the room with they Small Key located in one of the torches
- Get the Small Key by bonking against the torch
- Leave the room and walk two times east and one time south to open the key door
- Door Juke the door you just opened and kill the Popo's and leave the room north to enter the Swamp Palace
- Go upstairs and walk west and open the doors by pushing a statue on the trigger located in the top left corner
- Get yourself over the door trigger with a bomb and execute a YBA with the Red Potion and a Swordspin
- Now the memory of the game is corrupted and you enter the Arrghus fight
- After killing Arrghus you get the Blue Pendant
- S&Q after the fight and reset you gaming platform
Footage
Desert Palace Wallclip
Door Juke to enter Swamp Palace
Red YBA
Arrghus fight with corrupted VRAM
Helmasaur
- Chose Death Mountain to re-spawn and enter the cave with the Mini-Moldorm's to execute a Kiki Skip with a Bomb
- After entering Palace of Darkness go upstairs, one room south, going north in the middle and open the key door
- Now leave the fake Palace of Darkness and mirror once before entering again. To enter press down on the D-Pad
- Go north back into the room, push the Statue and Teleport at the same time
- Get yourself into the right position with Bombs at the door north just above the trigger and move down
- If the camera scrolls down, everything is correct
- Collect Bombs and Hearts and follow the path exactly
- If you scroll the camera to much to the top, you can not enter Helmasaur, you will stuck into the wall
- Beat Helmasaur
Footage
Statue Drag in PoD
Light World
- S&Q to Death Mountain, Midair S&Q to arm EG and re-spawn at Sanctuary
- River Clip to the West Wing of Hyrule Castle
- Get into EG and jump down the ledge two rooms south of Agahnim 1
- Continue north to defeat Agahnim 1
- After defeating Agahnim 1 mirror back to the Light World and fly to 1 and enter the Tower of Hera with the Hera Clip
- Clip to EG with a Bomb Clip and use the Herapot to get to the top of Hera Tower
- Walk east going upstairs and defeat Moldorm
- Re-enter the Tower of Hera and go upstairs to the right into the Beetle Room
- Do a YBA with the Blue Potion on the door west for a Dungeon Fake Flute
- Follow the Plaid route exactly and defeat 3x Lanmolas as well as 6x Armos Knights
- After collecting the Heart Container of the Armos Knights mirror back to the Tower of Hera entrance
- Bomb Clip back into EG and do a Midair S&Q north west of the Tower of Hera Lobby
- Re-spawn ad Link's House and fly to 1
- Enter the bottom left cave on the Death Mountain Overworld
- Bonk into EG and go south until entering Hyrule Castle again
- Go one room west and one room north and you are entering the Tricforce Room
Pathways

Part 1
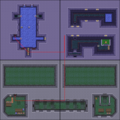
Part 2
Part 3


Footage
Path to Agahnim 1
Hera Lift
Plaid 2
Last Segment
Tips and Tricks
- Buying the Potions in the right order saves time on the Menu
- If you need full magic for Ganon, freeze an enemy with the Ice Rod and kill him with the Hammer. You will get a big magic drop for sure
- The first time in Plaid World you can collect 2 Fairies
- The Bug Net technically is a safety item but provides a lot survivability in the Plaid World fighting Trinexx and Vitrious as well for Kholdstare. Small time lose if you have to get rid of the Fairies before buying potions the second time
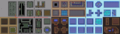
Item Locations
50% Chance for a Bomb

50% Chance for a Bomb
100% Chance for a Small Magic
100% Chance for a Heart and a Bomb


