Difference between revisions of "Hyrule Castle"
(→Rat hallway) |
m |
||
| (6 intermediate revisions by 2 users not shown) | |||
| Line 76: | Line 76: | ||
}} | }} | ||
| − | === | + | === Snake hallway === |
| − | Here's just a few ways to deal with the | + | Here's just a few ways to deal with the snakes. You need to read the RNG and react appropriately. |
There seems to be a very low chance of having a clear path on the top row, but that would be fastest (could pump against the wall for extra speed too). | There seems to be a very low chance of having a clear path on the top row, but that would be fastest (could pump against the wall for extra speed too). | ||
| Line 137: | Line 137: | ||
| description = A new strat found by Jadin can be done sometimes to save half a second here if no other rats are in the way. Diagonally boom the keyrat to prevent it going all the way up in the corner. | | description = A new strat found by Jadin can be done sometimes to save half a second here if no other rats are in the way. Diagonally boom the keyrat to prevent it going all the way up in the corner. | ||
}} | }} | ||
| + | |||
| + | ==== The Other Rats ==== | ||
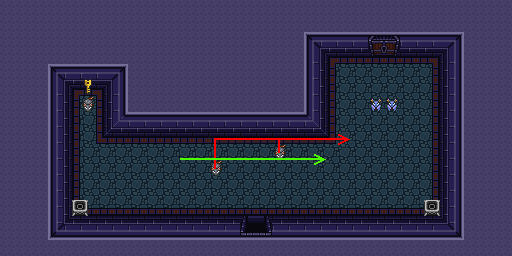
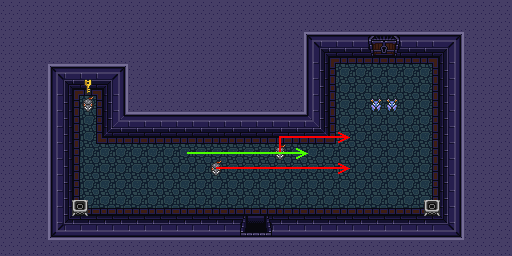
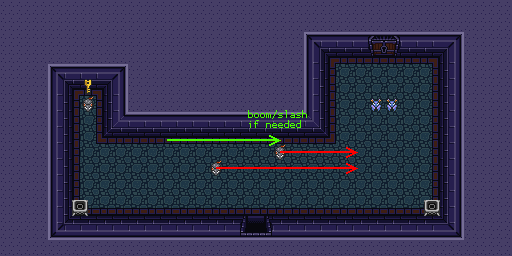
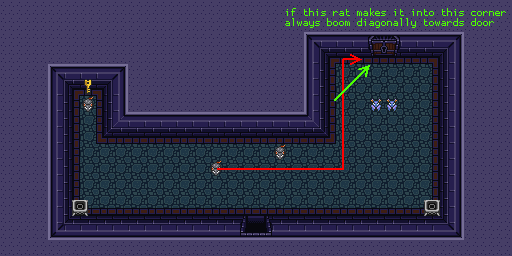
| + | When you enter the room, you can see the direction the other two rats are going in. If they go north or east, there is a chance you'll need to evade them on your way out after grabbing the key. By paying attention to their directions, you can prepare and adjust your position early when leaving. | ||
| + | {| class="wikitable" | ||
| + | |+ Rats always turn right when they hit an obstacle while moving. | ||
| + | | [[File:esc_keyrat-2a-NN.png]] | ||
| + | | style="text-align:center;"|Both rats go north: <br/> Stay one tile south of the wall. | ||
| + | |- style="vertical-align:middle;" | ||
| + | | [[File:esc_keyrat-2b-EN.png]] | ||
| + | | style="text-align:center;"|Left rat goes east, right rat goes north: <br/> Same as above, <br/> but the window to walk between them is small. | ||
| + | |- style="vertical-align:middle;" | ||
| + | | [[File:esc_keyrat-2c-NE.png]] | ||
| + | | style="text-align:center;"|Left rat goes north, right rat goes east: <br/> Stay two tiles south of the wall. | ||
| + | |- style="vertical-align:middle;" | ||
| + | | [[File:esc_keyrat-2d-EE.png]] | ||
| + | | style="text-align:center;"|Both rats go east: <br/> Stick to the wall and be ready to deal with a rat in your way. <br/> Or stay close to the bottom of the room and give up extra time. | ||
| + | |- style="vertical-align:middle;" | ||
| + | | [[File:esc_keyrat-3a.png]] | ||
| + | | style="text-align:center;"|Throwing a boomerang and missing is still better <br/> than getting hit in front of the door. | ||
| + | |} | ||
== Collected items == | == Collected items == | ||
| Line 143: | Line 163: | ||
There's no bombs or arrows available in this segment. | There's no bombs or arrows available in this segment. | ||
| + | |||
| + | == External Resources == | ||
| + | |||
| + | * {{Youtube|Fricker's Advanced Tutorial Series - Escape|v=28LeqTJMTvk}} | ||
= 100% NMG = | = 100% NMG = | ||
| Line 151: | Line 175: | ||
Placeholder text.. | Placeholder text.. | ||
| + | |||
{{ List_of_dungeons }} | {{ List_of_dungeons }} | ||
Latest revision as of 19:16, 10 March 2019
 | |
| Next dungeon | Eastern Palace |
|---|---|
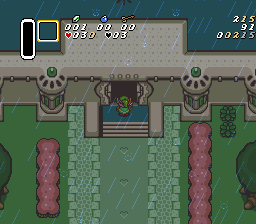
Hyrule Castle is the first section of the run of most categories. Not technically a dungeon (no big chest nor boss). It is commonly referred to as Escape.
Contents
Any% NMG
There's very few rooms with variable strats, so the segment is mostly about having good movement and reacting well to RNG.
Theory-TAS
Strats
First Keyguard
These strats both hits the guard twice, catching the guard between Link and the statue, finally boosting him towards the door, so that the key drops near the exit.
The main cues will be how much you walk rightwards before starting the diagonal down-right, and when to release the charge. You can use Link/sword vs. the tiles/guard for visual cues.
Left spin (optimal)
Instead of spinning the guard twice, you'll poke him first, move down, and then spin. The spin needs to be delayed a few frames, so hold v for about 6-8f before letting go of B.
The main reason this saves is that Link catches the key faster.
File
Top spin (optimal)~10f slower
Charge your sword upwards (can hold ^> during transition to be boosted a pixel to the right), then release the spin when you're on his upper right side. File
To make these strats easier, you can cut down on how much diagonal movement you do. Both strats are even possible without a single diagonal input. Most people land in some compromise between the optimal and the easy versions.
Ball 'n Chains / Black Knight
- Unless you're going for the 8 slash method, you'll need to boomerang the green guard at the start of the room every time. Even if he isn't in the way or doesn't notice you when you enter, he will notice you while you're grabbing the pot in the cell.
- If his first movement is up or down, you can boom downwards, just before cutting the corner, and continue moving rightwards, and the boom will hit him on its way back.
- He has a framerule-based AI, where his first attack can start early or late, so it's important to develop a movement/attack pattern that works for more than one pattern.
- If save state practicing, make sure you're not getting the same pattern every time (perhaps save outside the room, or re-enter every once in a while and make a new save).
- You can hit him once every half-second. Learning this timing is important to kill him quickly, and to be safe.
- The ball will not damage you while he's taking damage. This makes it possible to stand "in him" and keep slashing.
- Sometimes you might clink his ball when attacking. In this situation, you can keep holding the sword out and move into him, to poke him instead.
- There is a certain "read and react" to Ball & Chains - by practicing the screen a lot, you will be able to know when you need to delay a slash to not clink, or to adjust when he's pushed in the wrong direction.
- A pot will do 4 slashes worth of damage, but is slower to get than to do the 4 slashes.
8 slashes
Make sure you don't start walking diagonally too early. The main thing to tweak is Link's position relative to B&C when initiating the first attack. The closer you are to him, and the more leftwards you are, the faster you can do the fight. Most people initiates the fight at a lower position than this.
You can knock the guard leftwards with your 8th slash, so the key drops closer to the cell door. Booming the key diagonally usually grabs the key faster.
File
Pot + 4 slashes
If you wanted to be super safe, you could grab a second pot and kill him with it.
Since Link walks slower while carrying something, you want to minimize the distance you walk with the pot, so pay attention to the movement and when to throw it. After the pot is thrown, move down a little under the knight so your slashes recoil him into the top right corner.
File
Pot + pokespin + 2 slashes
Note that the sword starts out poking him, before releasing the spin, damaging him twice.
Easier than the other strats, since you only need to slash him twice (making it less likely that you'll get hit or clink him).
File
Snake hallway
Here's just a few ways to deal with the snakes. You need to read the RNG and react appropriately.
There seems to be a very low chance of having a clear path on the top row, but that would be fastest (could pump against the wall for extra speed too).
Keychest Room
Snake gamble
Sometimes the left snake isn't there in this hallway, so you can gamble on it not being there and just go around the right one. This saves about 10f. File
Snake gamble react
Sometimes the left snake is there, and you have to react quickly with your boomerang to stun the right one to get through. This is slower than just keeping right, since you won't be getting the wallpumps earlier in the room. File
Normal
This strat is pretty safe and consistent, and many top players prefer it over the other ones. Just pump the right wall and boom the snake that's there every time. File
Keyrat Room
There will be two rats on your screen when entering. The rat with the key is the one offscreen to your left, and he and the two other rats have several different things they can do.
As a general rule, you will want to pump some along the bottom wall and then airpump up some so that you can react to possible northwest keyrat.
The best thing that can happen is the keyrat coming towards you as you're walking left. You can just kill it (which requires some quick reactions but not too bad) and safely boomerang most of the time. File
For an advanced way to optimize the good keyrat RNG, the instaboom trick can be used to save about 10f. If you keep holding B after slashing, there's 2 frames where you're in the poke animation and can use the boomerang without the boomerang animation. File
This is the worst keyrat RNG you can get. It can be particularly dumb if one or two of the other rats join him in the corner, since they might drop a rupee and your boom won't fetch the key.
If you throw your boomerang upwards, instead of diagonal like in the video, be very careful of throwing the boomerang too quickly, as it often does not catch the key. Doing a diagonal boom like this always works, but is harder to execute.
File
A new strat found by Jadin can be done sometimes to save half a second here if no other rats are in the way. Diagonally boom the keyrat to prevent it going all the way up in the corner. File
The Other Rats
When you enter the room, you can see the direction the other two rats are going in. If they go north or east, there is a chance you'll need to evade them on your way out after grabbing the key. By paying attention to their directions, you can prepare and adjust your position early when leaving.
Collected items
You pick up Lantern and Boomerang in this segment.
There's no bombs or arrows available in this segment.
External Resources
100% NMG
Placeholder text..
First Chest Key (no boom)
Placeholder text..
