Difference between revisions of "Ice Palace"
(→Any% NMG: Added some spooky action explanation for IP) |
(→Quake) |
||
| Line 60: | Line 60: | ||
| description= Cancel the dash with up-left to set up the quick hop. Pick up the skull from the top. | | description= Cancel the dash with up-left to set up the quick hop. Pick up the skull from the top. | ||
}} | }} | ||
| + | |||
| + | '''"Quickfish"''' | ||
| + | |||
| + | There is a 5x9 pixel window from which you can throw an object where it will land outside the circle of rocks, but still spawn the Catfish. The range of coordinates are shown below. | ||
| + | |||
| + | [[File:Quickfish-Coords.png|frameless|default]][[File:Catfish Quick Toss Location.png|frameless|default]] | ||
=== First Room === | === First Room === | ||
Latest revision as of 23:25, 12 December 2019
 | |
| Boss | Kholdstare |
|---|---|
| Dungeon item | Blue Mail |
| Previous dungeon | Thieves' Town |
| Next dungeon | Misery Mire |
Contents
- 1 Any% NMG
- 1.1 Spooky action
- 1.2 Castle Gate
- 1.3 Ropa Lottery
- 1.4 Quake
- 1.5 First Room
- 1.6 Ice 02
- 1.7 Pengator Switch Room
- 1.8 Bombable Floor
- 1.9 Stalfos Knights
- 1.10 Moving Floor
- 1.11 Ice Palace Bomb Jump
- 1.12 Pengator Spin Room
- 1.13 Lonely Firebar
- 1.14 Block Switch
- 1.15 Magic Refill
- 1.16 Collected Items
- 1.17 Boss
- 2 100% NMG
Any% NMG
Spooky action
When you flute from outside of Skull Woods to Link's House, the duck exiting the screen sets an ancilla value that will mess with the Fire Rod shot in the first room of Ice Palace. In order to fix this variable, you should activate the flute and then transition the screen prior to the duck appearing on screen. This is most commonly done on the Link's House overworld screen, where you would activate the flute just prior to transitioning the screen north to the castle gate.
Castle Gate
It is possible to dash directly into the quick warp inside the castle gate (Link needs to be 1 or 2 pixels away from the right wall) by lining up with the signpost when you enter the screen, but it is a bad idea for two reasons:
- If you dash from that position, both the red and blue soldier can randomly hit you out of your dash. Damage will be taken, lag and chaos will ensue, seconds will be lost.
- Dashing into this warp causes around 20 extra frames of lag during the transition. Always cancel your dash before entering the warp.
A safe way to get across the bridge is to just dash a little further to the right, cancel your dash in front of the wall and then walk into the quick warp. After the transition hold down when you start your dash, otherwise you will dash at an awkward height where your sword does not cut the grass in front of you and you'll run at reduced speed. You can be fancy and block a spear that might be coming your way while you charge the last dash or just dash a few pixels lower. After you get to the next screen turn Link up before starting the next dash or you'll pick up the signpost in your way.
Ropa Lottery
If Link is at least 2 pixels away from the wall when entering the screen, you can just walk past the first Ropa and never get hit. Alternatively you can dash through and kill it.
The second Ropa is a total crapshoot. Walk diagonally when you pass Ropa #1 and don't nudge against the tree when you start the dash. Get hit roughly 10-20% of the time. Consider grabbing some of the upcoming backup-hearts.
Quake
There is a very simple setup for the quick warp on this screen. Bonk into the right wall immediately after you throw something into the water and the camera will be in the correct position. Just don't touch left or right on the D-pad until after the mirror warp.
Minimize the time Link spends walking in the water and carrying objects. After mirroring cancel the east dash with up once you hit the mini-slope, then start the next dash with up-right against the wall. Cancel this last dash before you hit the transition to Zora's Domain to mitigate a significant amount of lag.
If you use the bush from up on the hill, you get a 50% chance of a heart drop and barely waste any time. The stone next to Link after you use the mirror has the same 50% chance for a heart. On top of that the crabs' drops are almost always hearts, but hunting them down can be dangerous as well. You can get some relatively quick health refills on this screen, but none of them are guaranteed drops and you have to be careful to not get hit again in the process.
Backup Heart
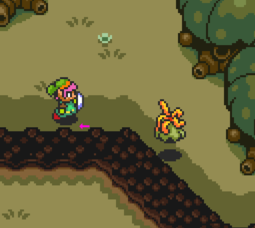
Dash as far as possible. You get increased movement speed carrying the bush after jumping down the ledge. File
Slightly Faster
Cancel the dash with up-left to set up the quick hop. Pick up the skull from the top. File
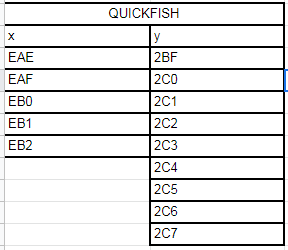
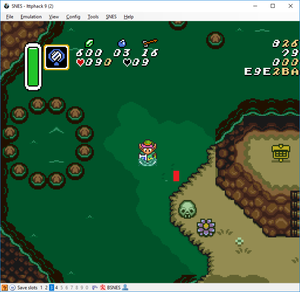
"Quickfish"
There is a 5x9 pixel window from which you can throw an object where it will land outside the circle of rocks, but still spawn the Catfish. The range of coordinates are shown below.
First Room
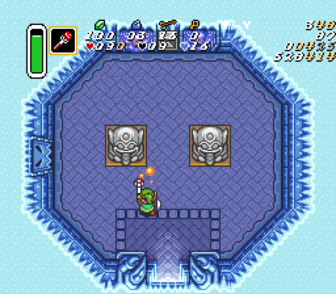
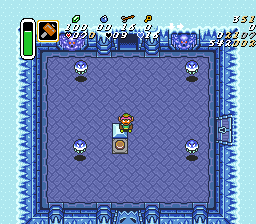
The Freezor wakes up once you move half a tile to the left - only your horizontal position matters. If you clearly hit him with the Fire Rod and he still didn't take damage, you shot too early. Sometimes you can hit him very early, but it's pure luck. To be safe walk at least as far into the room as shown in the picture before you shoot the rod.
If you performed the ancilla correction mentioned earlier in the article, then this Fire Rod shot is much easier. Simply shoot the Fire Rod into the wall as the Freezor is waking up, and the splash damage will damage him.
Ice 02
In this room we want to avoid killing all the enemies to prevent the door from re-opening (which pauses the game for a moment). It's possible to abuse the long death animation, that happens when you kill something with the Fire Rod to get a jelly out of your way and still make it out of the room before the door opens. Watch your magic meter! Optimally you don't want to use the Fire Rod more than twice throughout the whole dungeon, because that way there is just enough magic refills in the pots before Kholdstare. You also want to avoid leaving the room on the same frame that the last enemy dies. Doing this can cause the sprites in the remainder of the dungeon to spawn incorrectly or not at all, preventing you from progressing.
There is plenty of RNG at work in this room and no single strat will work every time. Time to improvise again.
Walkthrough for the beam-strat:
- Hold for a little bit when you step onto the ice.
- Change to to get some vertical momentum.
- Hold again during the slashes. Space them out enough to fire two beams.
- Start holding before collecting the key. Hold only diagonals from here.
- Press to lock Link in place on top of the key while it's spawning.
- While holding , change to and hold it until you're off the ice.
- Fire Rod the last jelly if it's in the way.
Sparky Makes You Wait
Shoving the jelly in the right direction is pretty much all you can do when it is sparking and you don't have beams. Avoid shooting the key-jelly with the Fire Rod, because it will take a long time to die in the fire and is not worth the magic. File
Pengator Switch Room
This room can be extremely laggy. Try not to touch diagonals and don't slash at enemies, especially with beams and when all of them are still alive.
Spin Attack
You can hold right all the way and release the spin as soon as it is charged, no need to slow down. Hold down-right for a frame or two when you enter the room to be able to more easily pick up the pot. File
Dash
Start the dash holding down and never touch a diagonal. Lots of lag variance with this strat. File
Bombable Floor
How early you can drop the second bomb entirely depends on the random movement of the jellies in the upper half of the room. Keep an eye on them and try to find the earliest safe opportunity to place the bomb. To be as safe as possible, you can take your time and slash the jellies out of the way first. In the end the most important thing is to not waste bombs or take damage.
Taking it Safely
The positioning of the second bomb gives me enough time to comfortably deal with the jelly, that's in the way. I wait for the switch to activate before I throw the bomb, so the pause doesn't throw me off. I nudge against the corner of the wall to aim my throw. File
Damage Boost
When you're at full health, you can take a risky damage boost from a jelly to position Link on the hole a little better and fall a decent amount of frames earlier. You get the heart back for free in the next room. File
Very Risky
You can drop the second bomb very early, but it arguably is a gamble, because you give the jellies so much time to change the direction they move in and surprise you. File
- You can hold right coming out of this door.
- The timing of the first bomb determines when the orange pegs rise from the floor. If that switch activation causes you trouble when you try to throw the bomb, try dropping the first bomb earlier or later.
- Slash at the first switch from far enough right to avoid the jelly next to it.
- Link can get stuck in the tight corner when you walk diagonally for some reason. Hold up until you made it past the wall to avoid that.
- If you get hit by the explosion of the second bomb, it will push you off the orange pegs and force you to hit the switch again. To be completely safe you can start pushing down during the pause that happens when the pegs switch.
Stalfos Knights
If you enter the room with only one bomb, you need to delay dropping the bomb until you collected the new one from under the pot or the game will auto-switch you to the next item and you have to menu again.
Drop the bomb on your way up immediately after you throw the pot, then keep walking slightly past it to trigger the upper Stalfos Knight. Once you reach the bottom wall, throw the pot up as soon as the lower Stalfos Knight hits the ground. You can start your dash as soon the lower skeleton's skull falls to the floor. File
Moving Floor
When you enter this room your eyes need to be set on the two jellies and the direction the floor is moving in. With sword beams you can kill the key-jelly early and take intentional damage from the spikes to set up a dash through the entire room. The jellies' movement is random and aiming beams to hit the correct jelly can be tricky on the moving floor. Depending on the direction the floor is moving in and the positioning of the jellies, you'll have to decide on the fly if you want to take damage or try maneuvering through the room manually. Improvise!
Walk of Good RNG
Usually the floor changes direction at just the wrong moment and a jelly starts sparking 1 frame before you hit it. File
Dash with Right-Moving Floor
While invulnerable you can just walk against the spikes to set up the dash through the middle. File
Dash with Left-Moving Floor
Hold up-right into the left side of a spike to get boosted like this. File
- Even without beams it can still be a good idea to walk into the spike and dash when the floor is moving right, because walking against the conveyor is just so slow.
- The black Babusu enemies deal two hearts of damage, so sometimes it might be a better idea to walk into a spike or jelly to take less damage and avoid getting hit by them.
- The exit door and moving floor don't work too well together. Prepare to get stuck and wiggle your way outta there.
- If you messed up the jelly room earlier, remember that the crystal switch needs to be set to blue.
- The floor starts moving when you enter the previous room, so if you savestate in front of the door you will always get the same initial floor movement. Practice both rooms together for best results.
Ice Palace Bomb Jump
Placeholder text ..
Pengator Spin Room
It's useful to get in the habit of slashing down when you enter the room (just press B without any D-pad input), because sometimes you will have beams and you don't want to accidentally hit a Pengator and mess up the line. Missing one guy can quickly cost something like three seconds.
Easy9'37
As long as you are sliding down during the spin attack you will hit all enemies. Easy if you take it slow, plus you get all the drops. File
Fast8'02
Find a visual cue for when to start holding diagonal. Release the spin as early as possible. Keep holding down-left until the spin attack has started. File
Lonely Firebar
These are the two extremes in terms of safety and speed. Of course you can come up with any number of compromises inbetween.
Easy Dash5'14
Dashing is the easiest way to get into the staircase and always a good backup-strat. File
Hammer-slide4'21
Step a little into the room before the first hammer. When changing directions make sure to hold the new direction before the attack animation is over. Once you start moving diagonally, only hold diagonals for the rest of the way. File
Block Switch
There are two ways to catastrophically mess this room up, resulting in a locked door in front of you. The only way to open it then is to go back upstairs and return to reset the room completely.
- Pushing the block in the wrong direction and putting it out of range of the switch.
- You can only push the block once. Trying to never press left on the D-pad in this room can be a good idea. Only tap up, then push down until the block moves, then right immediately and start a dash down.
- Toggling the switch twice with the block in position on the switch.
- There are three ways to toggle this switch: 1. Link steps onto it 2. Link steps off it 3. The block is moved onto it. On top of that the switch is no longer toggleable once the block is on it.
- Since you land on top of the block you can sometimes accidentally step onto the switch with Link while you are pushing the block down, resulting in an extra toggle (Link hits switch: door opens -> block hits switch: door closes -> switch blocked). To avoid this, make sure to push the block for as short as possible and walk right immediately when it starts moving. You can also walk up far enough that Link is not standing on top of the block any more before you start to push, if you want to be extra safe.
If you already walked onto the switch, there is still enough time to get off it (which toggles it a third time and opens the door back up) before the block arrives in position - if you react fast enough. If you want to be optimal, tap up-right instead of up before pushing. You can also have Link face down in the previous room before falling into the hole to mitigate human error and maybe save some frames.
Magic Refill
Make extra sure not to touch the statue when you walk past it, because it will slow Link down immensely.
Collected Items
You pick up Quake Medallion and Zora's Flippers in this segment.
Boss
- Main article: Kholdstare
100% NMG
Placeholder text ..
